Multi-language JavaScript messages in Dynamics 365 9.0 using RESX files

One of the not-so-shiny-and-mentioned-on-twitter-and-blogs feature of Dynamics 365 9.0 is simplification of localization of Web Resources. If you have ever worked on a international Dynamics CRM project, which required multiple Language Packs and not all users were using the same language, you probably had some difficulties when trying to show some message on the form using JavaScript or throw an exception with a message from plugin. There was no out-of-the-box localization strategy – some common dictionary with values for multiple languages from which we could easily get the value in current system user language. Of course there are a lot of possibilities here, all of which include usage of some kind of Web Resource like XML or JSON just to store the proper value in all required languages.

Dynamics 365 9.0 introduces new Web Resource type – RESX. This is the very well known, plain old resources file, which we have always used, long before JavaScript has become the leading technology in web development. It was (and still is) super easy to apply multiple languages on pages for our application using this kind of files. There is also a great Visual Studio addon – ResXManager which made it even easier to handle all the translations (so I strongly recommend to use it, if you have never heard of it). You can use this RESX types quite easily in your scripts to display messages in different languages based on current user preferred language.

How to achieve that? Firstly, you should prepare your RESX files in Visual Studio. As an example, I prepared 3 files – for English, Polish and German language:

1

Each file contains one key:

2

Now, let’s import the files into CRM system. The most important part here is that name of the Web Resource should be built using the following convention:

NAME.LCID.resx

So for example:

messages.1045.resx

for Polish messages.

There are some other possibilities here, I will write more about that in a second. You must remember to choose proper “Language” value when creating web resource. So you should end up with something like this:

3

Now we are ready to use them in our scripts. We should first register all the required resources as dependencies for script in which we want to use them, so if I want to use them in my lead.js I should go to the new tab “Dependencies” in properties of my lead.js Web Resource:

4

If you did not hear about this new functionality of D365 9.0 – dependencies allow you to register dependent libraries for your script, so if it uses jQuery, react.js and your custom common.js, you can simply register them as dependencies and don’t have to register all this scripts always together with lead.js (this is also working in ribbons, so no more isNaN dummy calls!)

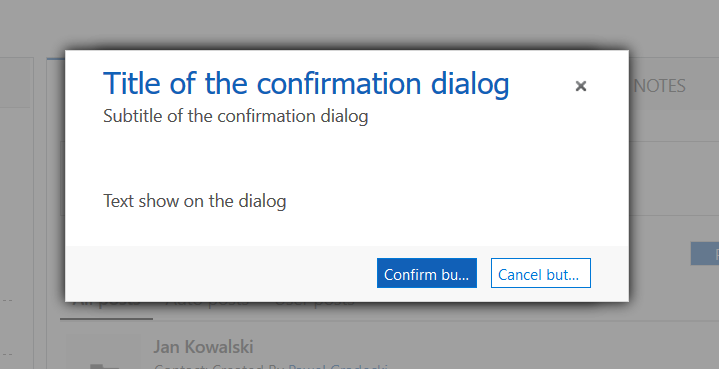
After all that we can simply call Xrm.Utility.getResourceString function to get the proper token:


function showAlertDialog() {
var localizedResult = Xrm.Utility.getResourceString("odx_/resx/messages", "qualifyingLeadMessage");
var alertStrings = {
confirmButtonLabel: "OK",
text: localizedResult
};
var alertOptions = {
height: 200,
width: 400
};
Xrm.Navigation.openAlertDialog(alertStrings, alertOptions);
}


And we can happily see our translated message, when we change to Polish language:

5

We can switch to English and we will see:

6

Really easy, isn’t it?

How this getResourceString function works? Well it simply looks for the proper Web Resource based on the current user preferred language, but it must have the proper name. If, for example, we call Xrm.Utility.getResourceString(“messages”, “myKey”) and our current language is Polish (and our Organization base language is English), it will be looking for the following files:

messages.resx
messages.1045.resx
messages
messages.1045
messages.1033

Then it will choose whichever first of these will have matching Language chosen in WebResource properties. That’s why I suggested to use NAME.LCID.resx – although there are some other possible ways of naming, this one looks the most clear and consistent for me.

Dynamics 365 9.0 Client-side navigation

In Dynamics 365 there has been a serious re-arrangement of all the namespaces and methods available for client-side scripting. If you are not aware of that already, please take some time to digest the following article:

https://docs.microsoft.com/en-us/dynamics365/get-started/whats-new/customer-engagement/important-changes-coming

There are many changes, but today I would like to focus on new namespace: Xrm.Navigation, which, as the name states, contains methods used for moving around the system and opening some resources. This functionality was previously inside Xrm.Utility namespace. Methods which we can use are the following:

  • openAlertDialog
  • openConfirmDialog
  • openErrorDialog
  • openFile
  • openForm
  • openUrl
  • openWebResource

Let’s look closely on each of them.

Xrm.Navigation.openAlertDialog
Previously we had Xrm.Utility.alertDialog which did not have that much features and in Web Client showed as the plain old alert, which was the same as from standard JavaScript “alert” function. Right now the alert is much better-looking, overlaying piece of html:

Capture

Looks much better right? The function can be called the following way:

Xrm.Navigation.openAlertDialog(alertStrings,alertOptions).then(
closeCallback,
errorCallback);

alertStrings and alertOptions are JSON objects specifying texts shown on the dialog and height/width of the dialog.

Example usage can look like that:


function showAlertDialog() {
var alertStrings = {
confirmButtonLabel: "This is text shown on the confirmation button",
text: "This is text shown on the dialog"
};
var alertOptions = {
height: 200,
width: 400
};
Xrm.Navigation.openAlertDialog(alertStrings, alertOptions).then(
result => {
console.log("Success! The dialog was shown");
},
error => {
concole.log(error.message);
}
);
}

Xrm.Navigation.openConfirmDialog
The equivalent of the deprecated Xrm.Utility.confirmDialog. This method looks now like that:

Xrm.Navigation.openConfirmDialog(confirmStrings,confirmOptions).then(
successCallback,
errorCallback);

Like before, confirmStrings and confirmOptions are JSON objects with some configuration. Have a look at the example:


function showConfirmDialog() {
var confirmStrings = {
cancelButtonLabel: "Cancel button label, by default it's CANCEL",
confirmButtonLabel: "Confirm button label, by default it's OK",
text: "Text show on the dialog",
title: "Title of the confirmation dialog",
subtitle: "Subtitle of the confirmation dialog"
};
var confirmOptions = {
height: 200,
width: 450
};
Xrm.Navigation.openConfirmDialog(confirmStrings, confirmOptions).then(
success => {
if (success.confirmed)
console.log("Dialog closed using OK button.");
else
console.log("Dialog closed using Cancel button or X.");
},
error => {
concole.log(error.message);
});
}

Result:

ConfirmDialog

Xrm.Navigation.openErrorDialog
There was no equivalent of this one before 9.0. This can simply show the error message which we are used to, but with all options (including the contents of the error log) specified by the developer. Again the method looks pretty straightforward:

Xrm.Navigation.openErrorDialog(errorOptions).then(
successCallback,
errorCallback);

Look at the example to check what errorOptions object consists of:


function showErrorDialog() {
var errorOptions = {
details: "This is simply the message that can be downloaded by clickick 'Download log file'",
errorCode: 666, //this is error code if you want to show some specific one. If you specify invalid code or none, the default error code wouldbe displayed
message: "Message show in the dialog"
};
Xrm.Navigation.openErrorDialog(errorOptions).then(
success => {
console.log("Dialog was closed successfully");
},
error => {
console.log(error);
});
}

Result:

Error dialog

Xrm.Navigation.openFile
This is also something new. This function allows us to open a file for example from an annotation in a supported way. Function looks like that:

 Xrm.Navigation.openFile(file,openFileOptions)

file is a JSON object specifying the file name and contents, while openFileOptions can have value of 1 to open file, and 2 to save file (behaviour of course depends on browser settings, most likely both these options will show file save confirmation dialog from the browser). Example usage:


function openFile() {
var file = {
fileContent: "bXkgc2VjcmV0IGNvbnRlbnQ=", //Contents of the file.
fileName: "example.txt", //Name of the file.
fileSize: 24, //Size of the file in KB.
mimeType: "text/plain" //MIME type of the file.
}
Xrm.Navigation.openFile(file, 2);
}

view raw

open_file.js

hosted with ❤ by GitHub

Result:

openFile

Xrm.Navigation.openForm
It replaces the old Xrm.Utility.openEntityForm and Xrm.Utility.openQuickCreate functions. Function is quite generic, the usage looks like that:

 Xrm.Navigation.openForm(entityFormOptions,formParameters).then(
successCallback,
errorCallback);

To open account entity with some field prepopulation you can go with:


function openEntityForm() {
var entityFormOptions = {
entityName: "account",
useQuickCreateForm: false
};
var formParameters = {
name: "Sample Account",
description: "This is example of how you can prepopulate the fields on opened entity"
};
Xrm.Navigation.openForm(entityFormOptions, formParameters).then(
success => {
console.log(success);
},
error => {
console.log(error);
});
}

view raw

open_form.js

hosted with ❤ by GitHub

Result (see that the name has been populated):

openForm

There are many, many options here, including createFromEntity which will designate a record to prepopulate fields based on the mapping, opening in new window or specifying business process flow that should be displayed on the form. Really go through the documentation on this one.

Xrm.Navigation.openUrl
Opens specified URL and also there was no relevant function before 9.0 (so basic functionality, no comment…). Function is really simple:

Xrm.Navigation.openUrl(url,openUrlOptions)

Example usage:


function openUrl() {
var url = "http://google.com";
var openUrlOptions = {
height: 400,
width: 800
};
Xrm.Navigation.openUrl(url, openUrlOptions);
}

view raw

open_url.js

hosted with ❤ by GitHub

Result:

openUrl

Xrm.Navigation.openWebResource
The old version (Xrm.Utility.openWebResource) was usually not very useful as we had no control on how it is opened and it was always a new window. The new version gives us possibility to specify if it should be new window or not but still it lacks the most important feature – to show as a dialog overlaying the current page. As I checked already it almost as useless as the old one, unfortunately 😦 The current version can be called the following way:

 Xrm.Navigation.openWebResource(webResourceName,windowOptions,data)

Example:


function openWebResource() {
var windowOptions = {
openInNewWindow: false,
height: 400,
width: 400
};
Xrm.Navigation.openWebResource("new_mywebresource.html", windowOptions, "someAdditionalParameter");
}